- Sending an email to all volunteers
Unless you specify certain records, the default setting is to send to all of the records. If you click the "Email" button from the Volunteers tab (and do not specify any specific records), emails will be sent to all volunteers. This also works the same way on the Opportunities and Organizations tabs. If no records are selected, emails will be sent to all contacts.
- Sending an email to one volunteer
Select the volunteer by checking the box next to their name. Click Email and create the Email template.
- Sending an email to multiple volunteers
If you are only sending this message to a few volunteers, it might be easiest to just select their names before you start. If there are a lot of volunteers but not everyone on the list, you may want to run a search so that you have the grid you want in front of you before you start. Remember, the "All Records" option means all of the records in the current grid will receive the message.
Notes:
- When sending emails to multiple Volunteers, Opportunities, or Organizations, the recipients will only see their own email address in the "To" field. All other addresses will be hidden or BCC'd (blind carbon-copied).
- Since there is no “Saved Email” make sure to include yourself in the BCC.
- You can create templates and signature files to use again and again
- Mail Merge Fields allow you to customize your email AND send to multiple recipients
- To select a merge field, find the field from the alphabetical list on the right and then make sure your cursor is in the body of the email where you would like to place the field
Sending an Email
- Click Email button from the left menu (Function Buttons)
- Choose recipient - the default is to send to all volunteers. To send to only some volunteers, select To override recipient field, insert merge fields or email… and manually add the email addresses

- Add a Reply To address and the Sender’s Name
- Add any CC or BCC information to your email.
- Make sure the Sender Organization is reflected correctly
- Add a Subject line
- Create the body of your email. Use Mail Merge fields to create personalized messages
- Save your email template by inserting a name and clicking Save
You may make this template available to other users by clicking the Set Template Permissions and Sharing text

Special feature for Opportunity Emails
If you would like to send an email to your Opportunity Contacts, we have made it possible for you to do so without sending multiple emails to Opportunity Contacts that are listed for multiple Opportunities. This is a great feature for sending Opportunity Reports or Data Grid Reports (if enabled).

Note: The mail merge fields are unavailable when using this feature.
Additional steps (optional):
- Add an attachment
- Attach and insert image (see steps below)
- Attach a saved Grid Report Warning: Grid Reports may contain PHI/PII and an agreement must be in place for this option. Please speak to your Account Manager for details.
- Attach a preset Report (varies vol to opp)
- Preview the email
- Choose email type (required if enabled)
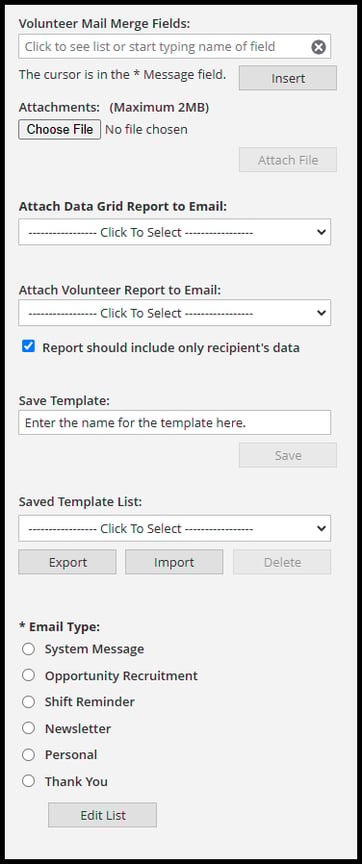
Add an attachment to an email
- Click Choose File and select file from computer
- Click Attach File to add to system
- Click Insert and image will be added to the body of the email

Set the Email Type (if enabled)
The Email Type System message is the default. Volunteers are not allowed to opt out of emails set to System message, such as a "forgot password" email or emergency communications
A list of sample types have been added, but these can all be edited from the email system with the exception of the System Message
Each email will be assigned a Footer where volunteers will be able to click on a link that goes to a page where they will set their preferences.

Note: If a volunteer wants to change their Email Preferences (specify the Email Types they want to receive) they can do so via the click here link. The Coordinator is not automatically notified when a volunteer opts out of a type of email.